
Legendary Gems are the most powerful ongoing progression system in the Diablo 3 endgame. You socket them into rings and amulets, level them inside Greater Rifts (GRs), and they underpin every serious push build. This guide comprehensively covers how to get them, exactly how the upgrade mechanic works, what each gem does, and which three gems to run for which content — accurate to patch 2.7.x.
What Are Legendary Gems?
Legendary Gems are special stones that fit only into the sockets of rings and amulets — never armor or helms; the only exception is the Gem of Ease, which fits only into weapons. Each gem has two effects:
- A primary effect, active from
Rank 0and growing stronger with every upgrade rank. - A secondary effect, fixed in value, that unlocks once the gem reaches
Rank 25.
Every gem is unique-equipped: you cannot wear two of the same type at once. Because you only have three sockets (two rings + one amulet, assuming all three pieces have a socket), choosing your three gems is one of the most consequential build decisions you make.
Getting Your Sockets Ready
A gem needs a socket to live in. Two routes:
- Roll a native socket — rings and amulets can drop with a socket already on them.
- Add a socket at the Mystic — enchant a primary affix on a ring or amulet into a socket, if it doesn't already have one.
How to Obtain Them
Legendary Gems come from essentially one source:
- Complete a Greater Rift and kill the Rift Guardian.
- As long as you don't yet own every type, the Guardian drops one or more new gems at
Rank 0. - Repeat until you've assembled the full collection of roughly 20+ gems.
After the Guardian dies, Urshi, a nephalem spirit and gem mystic, appears. Every upgrade happens through her.
Rank 25 early and collect the rest along the way.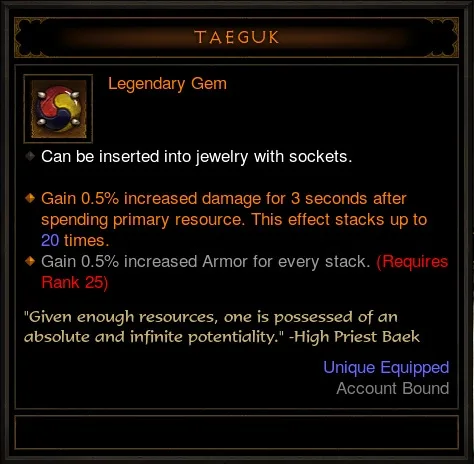
The Upgrade Mechanic (Urshi)
After every completed GR, Urshi offers upgrade attempts. Here is exactly how the system works:
Number of Attempts
- 3 base attempts are available after each GR.
- +1 attempt if you completed the rift without dying.
- +1 attempt if you empowered the GR with gold before entering it.
That's up to 5 attempts per run. You can distribute them freely: all on one gem, or split across several socketed gems.
Success Chance
Each attempt's chance depends on the relationship between the GR tier you cleared and the gem's current rank:
- Guaranteed success (100%) as long as the gem's rank is at least 10 below the GR tier. A cleared GR 50 levels any gem up to rank 40 with guaranteed upgrades; above that the chance drops through 90, 80 and 70% to 60%.
- Sharply diminishing chance once the rank exceeds the GR tier — 30%, 15%, 8%, 4% … at +1, +2, +3, +4 ranks over the GR tier (60% at equal rank).
Only some gems have a maximum rank: Gogok of Swiftness 150, Esoteric Alteration and Mutilation Guard 100, Legacy of Dreams 99, Iceblink and Boon of the Hoarder 50; the rest have no cap in the game data. The practically relevant milestones are:
- Rank 25 — unlocks the secondary effect (the key milestone for every gem).
- Rank 50 — a solid level for most builds.
- Rank 100+ — almost only worthwhile through the Caldesann's Despair augment system, where high ranks determine the strength of the item augment.
The Most Important Gems
Damage & Pushing
- Bane of the Trapped: +15% damage to enemies that are slowed or controlled; at
Rank 25an aura slows nearby enemies even without other crowd control. Mandatory in almost every build, since it effectively keeps itself active. - Bane of the Powerful: +20% damage for 30s after killing an elite; at
Rank 25it adds a permanent +15% damage to elites. Excellent for speed runs where elites die constantly. - Bane of the Stricken: Every hit on a target permanently increases your damage to that target (stacking over time); at
Rank 25it adds bonus damage to bosses and Rift Guardians. The premier boss killer and indispensable for high-end pushing.
Speed & Resources
- Gogok of Swiftness: Hits build up to 15 stacks of attack speed and dodge chance;
Rank 25adds cooldown reduction (CDR) per stack. Extremely strong in CDR-dependent builds. - Taeguk: Stacks up to 10 times while you spend resources for bonus damage, plus +armor per stack at
Rank 25. Ideal for channeling builds with constant resource use. - Simplicity's Strength: +damage with primary (free) skills, plus healing on hit from
Rank 25— a classic leveling gem.
Ranged
- Zei's Stone of Vengeance: Bonus damage scaling with distance to the target (capped around 50 yards), plus a stun chance at
Rank 25. The best gem for ranged builds such as Demon Hunter and Wizard.
Defense & Healing
- Esoteric Alteration: Substantially reduces non-physical damage taken, with an even stronger bonus at low life from
Rank 25. The standard defensive push gem. - Molten Wildebeest's Gizzard: Boosts life regeneration; at
Rank 25it builds an absorb shield when you avoid damage for 4 seconds. A solid solo-survival pick.
Proc Gems (Extra Damage & Utility)
- Mirinae, Teardrop of the Starweaver: Hits have a 15% chance to smite a nearby enemy for Holy damage and heal you for 3% of your maximum Life — a popular speed gem.
- Wreath of Lightning: Hits grant a lightning-tornado aura and, from
Rank 25, +25% movement speed — beloved for speed farming. - Pain Enhancer: Critical hits cause enemies to bleed (damage over time); at
Rank 25nearby bleeding enemies increase your attack speed. Strong against trash packs.
Leveling Helpers
- Gem of Ease: At
Rank 25it sets the weapon's level requirement to 1 and grants massive bonus experience. Mandatory for power-leveling alts. - Boyarsky's Chip: +Thorns damage; at
Rank 25your Primary skills taunt the first enemy hit — a tank/leveling gem for Hardcore and follower setups.
Push vs. Speed: Which Three Gems?
Your three sockets define your effectiveness. Rules of thumb for patch 2.7.x:
High Pushing (highest GR tier, long boss fight)
- Trapped (always on, kills the trash) +
- Stricken (kills the boss / Guardian) +
- a defensive gem (Esoteric Alteration) or a class-specific damage gem (Zei, Taeguk), depending on how much survivability you need.
Speed GRs, Bounties & XP Farming
- Powerful (near-permanent buff from constant elite kills) +
- Gogok (speed & CDR) +
- Wreath of Lightning or Mirinae for movement speed and trash clear.
Common Mistakes
- Pushing too high or too low: A GR far below your gem rank wastes guaranteed attempts on low ranks; a GR far above your comfort zone costs you the no-death bonus (−1 attempt) and possibly the whole run.
- Forgetting to empower: For valuable upgrades (e.g. heading toward an augment), the gold empower for a fifth attempt is almost always worth it.
- Wrong gem in a speed run: Stricken in a bounty/speed setup is a dead socket.
Pro Tips
- Plan your augments: Caldesann's Despair augments require high-rank gems (Rank 25–50 for mid-tier augments, far higher for the absolute endgame). Keep a dedicated "augment gem" you only level for augmenting.
- Three-gem routine: For leveling sessions, always socket three different gems so no attempt is wasted if one has become "hard" to upgrade.
- No-death matters: The fourth attempt from surviving the rift is worth a lot over many runs — play more defensively while leveling rather than dying aggressively.
Remember: when pushing, Trapped kills the trash, Stricken kills the boss — and a defensive gem keeps you alive long enough to see both.
 Login with Battle.net