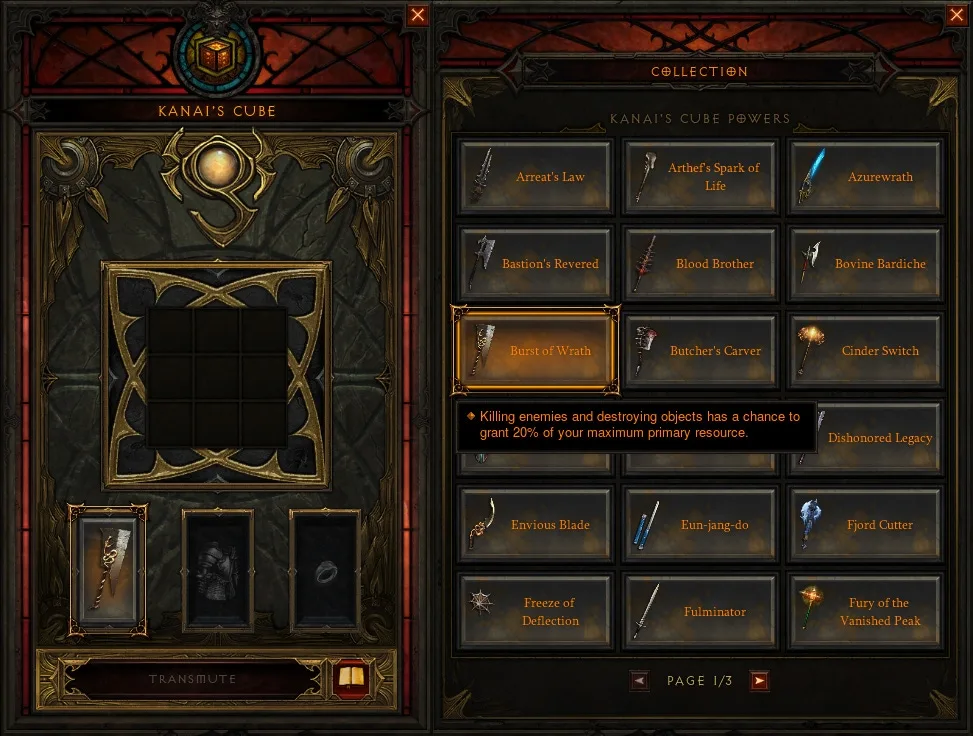
Kanai's Cube is the single most powerful crafting tool in Diablo 3 and, since patch 2.3, the backbone of nearly every build. With it you extract legendary powers, reforge items, convert set pieces, augment Ancients and transmute reagents. Anyone serious about pushing Greater Rifts (GRs) cannot do without it — the Cube decides how many legendary effects your hero can run at once.
This guide walks you through unlocking the Cube step by step, every recipe with its exact reagents, which powers to cube per slot, and the mistakes beginners make over and over again.
What Is Kanai's Cube?
Kanai's Cube is an artifact recovered from the Ruins of Sescheron that once belonged to the barbarian Chief Elder Kanai, its last guardian. It is the precursor to the legendary Horadric Cube from Diablo 2 and, in Blizzard's words, holds "immeasurable transmutation power."
Functionally it replaces the old crafting station and enables five fundamentally important things:
- Extracting legendary powers from items so you can use them passively — without having to wear the item.
- Reforging (rerolling every affix) and upgrading items.
- Converting set pieces and crafting materials.
- Gambling rare items up into Legendaries.
- Augmenting Ancient items with enormous stats (Caldesann's Despair).
Why the Cube Is So Powerful
Before the Cube, every hero was limited to 13 equipment slots. The Cube effectively grants three extra legendary effects on top — a flat build upgrade that virtually every class is forced to use. This stacking of multipliers is exactly why modern D3 builds reach such high GR tiers.
Unlocking the Cube
The Cube sits in Act III, in the zone The Ruins of Sescheron, which is only accessible in Adventure Mode.
- Start a game in Adventure Mode (unlocked for all accounts by default since patch 2.7.4 — no campaign completion required).
- Open the Act III map and travel by waypoint to "The Ruins of Sescheron."
- Make your way through the frozen zone to the Elder Sanctum and on to its dead end at the north-eastern edge of the map.
- In the Elder Sanctum the Cube rests on a pedestal, guarded by Kanai's spirit. Click it and pick it up.

Opening the Cube
Once found, the Cube stands in every town in Adventure Mode — to cube, head to town and click it.
The Three Cube Slots
Extracted powers are sorted into three categories. You may have one power equipped per category at a time — so three powers total:
- Weapon — e.g. The Furnace, In-geom.
- Armor — e.g. Aquila Cuirass, Illusory Boots, Nemesis Bracers.
- Jewelry (rings/amulet) — e.g. Convention of Elements (CoE), Unity, Halo of Karini.
Wear It or Cube It?
The central optimization question: some items you want on your body because you also need their affixes (Strength, crit damage, cooldown, etc.). Others give the identical effect when cubed and free up an equipment slot you can then fill with better stats. This trade-off is the very heart of the Diablo 3 endgame.
Rule of thumb: cubing a power is worth it when you need the effect but the item itself rolls poor stats — or when you need the slot more urgently for another item.
The Key Recipes
Every recipe is selected from the Cube menu; each requires a source item plus a material combination.
Extract Legendary Power (Archive of Tal Rasha)
Turns a legendary/set item into its raw power. The item is destroyed and the power lands permanently in your catalogue.
- Reagents: 1 item + 1× each of the five bounty materials (Khanduran Rune, Caldeum Nightshade, Arreat War Tapestry, Corrupted Angel Flesh, Westmarch Holy Water) + 5× Death's Breath.
- Cost: fixed — every extraction costs the same; switching between stored powers later is free.
Reforge Legendary (Law of Kulle)
Rerolls every affix on a legendary/set item — perfect for chasing a flawless Ancient piece. Each reforge also has a chance to produce an Ancient or even Primal Ancient version.
- Reagents: 5× each of the five bounty materials + 50× Forgotten Soul.
Convert Set Item (Skill of Nilfur)
Converts a set piece into another random piece of the same set — ideal when you're missing exactly one slot.
- Reagents: 10× Forgotten Soul + 10× Death's Breath (no bounty materials).
Upgrade Rare to Legendary (Hope of Cain — the "gamble")
Upgrades a rare (yellow) item into a random Legendary of the same item type. The most efficient way to fish for a specific Legendary.
- Reagents: 25× Death's Breath + 50× Reusable Parts + 50× Arcane Dust + 50× Veiled Crystal per attempt (base: a level-70 rare item).
Convert Crafting Materials (Pleasure/Regret/Wrath of Iben Fahd)
Converts 100 Reusable Parts, Arcane Dust or Veiled Crystal 1:1 into another of these types (plus 1× Death's Breath and an item of the target rarity). Handy when one material type runs dry while another overflows.
Remove Level Requirement
Makes twink gear usable on a level-1 character (recipe "Work of Cathan", requires a rank-25+ Gem of Ease) — invaluable for fast power-leveling new Season heroes with pre-staged items.
Upgrade Legendary Item (Curiosity of Lorath Nahr)
The newest recipe sits on page 11 of the recipe book: for 100 Primordial Ashes you turn a legendary item into its primal version. Primal items carry the top value of the ancient range on every fixed property – the item pages show those values for each item under "Ancient & primal values". All eleven recipes with their exact ingredients are also listed in our Kanai's Cube: recipes & powers overview.
Augmenting: Caldesann's Despair
The single most important endgame recipe. You permanently add a huge amount of main stat to an Ancient or Primal Ancient item.
- Reagents: 3× Flawless Royal gems (Ruby/Emerald/Topaz for your main stat, Amethyst for Vitality) + 1× Legendary gem (minimum rank 30 for weapons, 40 for jewelry, 50 for armor).
- Bonus: main stat = 5 × the rank of the legendary gem used. A rank-100 gem therefore grants +500 Strength/Dexterity/Intelligence on that item.
Strategy: Which Power per Build?
A proven rule of thumb: one offensive weapon power, one defensive armor power, one utility/damage jewelry power.
Weapon Slot
- The Furnace — +50% damage to Elites. The push standard for almost every class.
- In-geom — reduces your skill cooldowns by 10 seconds for 15 seconds after killing an elite pack. First choice for speed farming.
Armor Slot
- Aquila Cuirass — 50% damage reduction at high resource. The defensive default for many classes.
- Nemesis Bracers — shrines spawn Elite packs. Top pick for speed-farming materials and XP.
- Illusory Boots — walk freely through enemies. Small but valuable for pushing.
Jewelry Slot
- Convention of Elements (CoE) — a rotating elemental damage bonus of up to +200% for massive burst in push runs.
- Unity — splits damage with a follower/ally; paired with the follower's immortality item (e.g. Enchanting Favor) it's extremely strong for solo pushing.
- Halo of Karini — strong damage reduction after your Storm Armor hits a distant enemy (Wizard only).
Pushing rule of thumb: damage in the weapon slot, survival in the armor slot, a multiplier in the jewelry slot.
Common Mistakes & Pro Tips
- Mistake: Forgetting the Cube in a new Season. Without it you're missing three legendary effects — get it first.
- Mistake: Waiting for a better roll before extracting. Extracted powers always get the maximum value — extract right away.
- Mistake: Wasting materials reforging. Only reroll genuine BiS candidates, not every Legendary.
- Tip: Keep plenty of Forgotten Souls on hand for reforging (50 per attempt) — they are the most common bottleneck in the endgame.
- Tip: When gambling, choose the rare item type with the smallest Legendary pool to fish efficiently.
- Tip: Skip the 2-second animation by switching to the previous and back to the next recipe after "Transmute" — when mass-cubing at season start it saves an enormous amount of time.
 Login with Battle.net