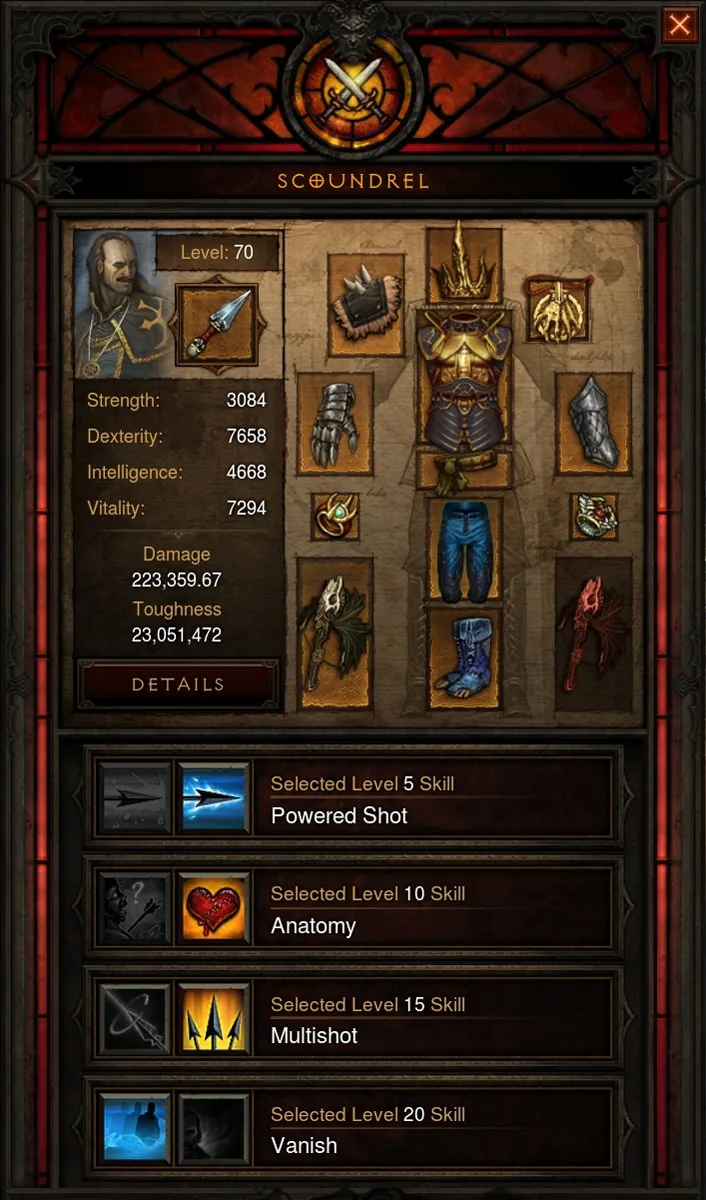
In solo Diablo 3, followers stopped being decoration a long time ago — they are a complete second gear set, a permanent buff source, and the key to several of the strongest tricks in the endgame. Since the big follower rework in Patch 2.7.0 (Season 23), the Templar, Scoundrel and Enchantress keep you permanently buffed, wear 14 gear slots, and through the Emanate system they share whole legendary effects with you. This guide covers everything for current content (2.7.x): how to unlock and gear them, what every single skill does, which legendaries emanate, and which setup you want for speed farming versus Greater Rift pushing.
What a follower is and why it matters
A follower is a controllable NPC that joins you in solo play. You can choose between three followers — the Templar, the Scoundrel and the Enchantress — but you can only have one active at a time.
- In solo play, the follower is permanently at your side.
- In groups, followers disappear entirely — there, players buff each other instead.
- Each follower has its own main stat that scales its values: Templar = Strength, Scoundrel = Dexterity, Enchantress = Intelligence.
The Patch 2.7.0 rework: what changed
Followers used to be weak: they wore only six slots, their buffs flickered on and off because the AI cast skills too rarely, and they died constantly. The Patch 2.7.0 rework fundamentally rebuilt the system.
Permanent buffs in solo play
A follower's active buff skills are now permanently active in solo play as long as the skill is selected. You no longer wait for the AI to trigger, say, the crit buff — it stays on permanently.
14 gear slots instead of 6
The follower now wears a full character gear set:
- Special relic (follower-specific)
- Helm, Shoulders, Chest, Gloves, Bracers, Belt, Pants, Boots
- Amulet and two rings
- Main-hand weapon and off-hand/shield
This lets you give the follower targeted stats and, above all, emanate-capable legendaries.
Emanate
The key new feature: certain legendary powers and set bonuses radiate their effect from the follower onto you. You gain the effect without having to wear the item yourself — a huge gain in build flexibility.
Higher priority for cheat-death skills
The followers' "revive" skills (Vanish, Fate's Lapse, Guardian) now have higher priority than your own character's cheat-death effects and trigger first.
How to unlock and gear followers
Followers join you over the course of the campaign. In Adventure Mode (endgame) all three are available immediately.
- Open the follower menu (default key F on PC, or via the game menu) and select one of the three followers to hire them.
- Click the follower (or open their inventory) to see their equipment window with the 14 slots.
- Drag items onto the slots just like for your own character. Watch for the correct main stat and for emanate-capable legendaries (see below).
- In the lower skill bar, pick the follower's four abilities (one per tier: Templar and Scoundrel at levels 5, 10, 15 and 20, the Enchantress at 15, 20, 25 and 30).
- Equip the follower's immortality relic so they never die.
The three followers and their skills
Each follower has four selectable abilities (Templar/Scoundrel: levels 5, 10, 15, 20; Enchantress: 15, 20, 25, 30). In solo play the buffs are permanent — so choose the ones that benefit your build most.
Templar — tank, healing and resource
The Templar is the tankiest follower. He pulls aggro, stuns enemies and keeps you alive. His main stat is Strength.
- Inspire: regenerates your resource — gold for resource-hungry builds.
- Charge / Onslaught: Charge stuns all enemies within 8 yards; Onslaught makes the target and nearby enemies take 10% more damage for a few seconds.
- Loyalty: life regeneration for you and the Templar.
- Heal: an active heal when your life drops.
- Guardian: the cheat-death skill — saves you from fatal damage, knocks enemies back, heals and briefly shields you.
Scoundrel — damage and the crit buff
The Scoundrel is the damage follower and provides the coveted Critical Hit Chance buff (+1.8% to +4%). His main stat is Dexterity.
- Anatomy: +1.8% to +4% Critical Hit Chance (based on the Scoundrel's Dexterity) for you (permanent in solo play) — almost always the mandatory skill.
- Powered Shot / Multishot: respectable single-target and area damage.
- Hysteria: after a critical hit, you and the Scoundrel deal 3% more damage for a few seconds.
- Vanish: the Scoundrel's cheat-death skill — on fatal damage it briefly hides you from enemies, preventing death.
- Piercing Shot: a ranged attack after which enemies hit take 10% more damage for a few seconds.
- Night's Veil: creates a 20-yard cloud in which all attacks against enemies are critical hits — according to Maxroll the main reason to bring the Scoundrel.
Enchantress — CDR, disable and armor
The Enchantress is the utility follower for pushing and disable builds. Her main stat is Intelligence.
- Powered Shield (formerly Powered Armor): reduces ranged damage taken, increases your Armor and slows melee attackers.
- Focused Mind: aura granting +3% to +6% Attack Speed to you and the Enchantress.
- Prophetic Harmony: 5% to 10% Cooldown Reduction (CDR) — valuable for CDR-dependent builds.
- Charm / Temporal Pulse: extra crowd control (charm or slow enemies).
- Fate's Lapse: the Enchantress's cheat-death skill.
Follower-specific relics (immortality)
Each follower has its own relic category that only it can equip. The most important variant makes them immortal:
- Templar: Enchanting Favor — prevents the Templar from dying.
- Scoundrel: Skeleton Key — protects the Scoundrel from death.
- Enchantress: Smoking Thurible — makes the Enchantress immortal.
Emanate — legendary effects the follower shares with you
Legendary powers on Blizzard's official Emanate list work from the follower as if you were wearing the item yourself. A few other legendaries aren't on that list but still work on the follower because it triggers their effect itself. Either way you save precious gear slots and even Kanai's Cube slots. The most important ones:
On the official Emanate list (since patch 2.7.0):
- The Flavor of Time: doubles the duration of pylon effects — extremely valuable in speed farming.
- Nemesis Bracers: shrines and pylons additionally summon a Champion pack.
- Avarice Band: massively widens your gold pickup radius (goblin/speed farming).
- Gloves of Worship: shrine effects last 10 minutes.
- Also Broken Crown, Homing Pads, Spaulders of Zakara, Goldskin, Custerian Wristguards, Gladiator Gauntlets, Dovu Energy Trap, Rakoff's Glass of Life, Krede's Flame and the 3-piece bonuses of Sage's Journey and Cain's Destiny.
Not on the list, but they work on the follower:
- Oculus Ring: the damage zone (up to +85% damage while you stand in it) is generated by the follower — you don't need to wear the ring yourself.
- Unity: splits damage evenly. Wear one Unity on you and the second on the follower (with an immortality relic) to effectively halve the damage you take — one of the strongest defensive tricks in the game.
- Cord of the Sherma: creates a chaos field on hit that blinds and slows enemies — works when worn by the follower.
Rule of thumb: only powers on the official Emanate list work on you as if you wore them yourself; Oculus Ring, Unity and Cord of the Sherma are special cases because the follower triggers their effect itself.
Best setup: speed farming
For low-to-mid Greater Rifts, bounties and key farming, speed and comfort are what count.
- Follower: Enchantress — according to Maxroll the default for Torment 16 and speed GRs, because she is the only follower who gives you Cooldown Reduction (Prophetic Harmony).
- Special item: Hand of the Prophet — the Enchantress gains all of her skills at once. Since that uses the relic slot, she survives thanks to the Legendary Gems Esoteric Alteration and Mutilation Guard (the only gems that work on followers) plus Vitality and Life %.
- Items: The Flavor of Time (longer pylon buffs) and Nemesis Bracers (extra elites at shrines); on Torment 16 add Avarice Band (pickup radius), Gloves of Worship and the 3-piece bonuses of Sage's Journey and Cain's Destiny, in speed GRs the Oculus Ring instead.
- Goal: Cooldown Reduction plus maximum loot/speed comfort.
Best setup: Greater Rift push
When pushing high Greater Rifts (leaderboard), damage and survival are what matter — plus a follower that never dies.
- Follower: according to Maxroll, for most push builds the Scoundrel with Anatomy (+1.8% to +4% Critical Hit Chance), Piercing Shot (enemies take 10% more damage) and Night's Veil (a cloud in which all attacks are critical hits). At level 5, pick neither of the crowd-control skills (Crippling Shot, Powered Shot).
- Relic: Skeleton Key (immortality).
- Items: Oculus Ring (damage zone) and especially Unity (with a second Unity on the player) for halved damage taken, plus The Flavor of Time, Nemesis Bracers and Ice Climbers (protect the follower from freeze and immobilize).
- Alternatives: the Enchantress with Temporal Pulse, Prophetic Harmony, Powered Shield and Focused Mind (plus Smoking Thurible) for builds that need Cooldown Reduction or Attack Speed — or the Templar with Heal, Onslaught and Guardian (plus Enchanting Favor) for builds lacking recovery.
- Goal: maximum damage at the Rift Guardian and against dense elite packs without losing your follower.
Rule of thumb: push with the Scoundrel, speed-farm with the Enchantress — take the Templar when your build needs healing or resource.
Common mistakes
- No immortality relic: the most common beginner mistake. A dead follower provides neither buff nor emanate.
- Wrong follower for the activity: according to Maxroll the Scoundrel (Anatomy, Night's Veil) is usually first choice for pushing, the Enchantress for speed farming thanks to her Cooldown Reduction.
- Misunderstanding Emanate: putting most set bonuses or Convention of Elements on the follower does nothing — those don't emanate (exceptions: the 3-piece bonuses of Sage's Journey and Cain's Destiny).
- Wrong main stat: items with the wrong stat (e.g. Intelligence on the Scoundrel) waste the follower's stats and toughness.
- Leaving follower slots empty: every empty slot is a wasted emanate or stat slot.
Pro tips
- Double Unity is by far the strongest defensive trick: one Unity on the player, one on the immortal follower — you effectively take only half the damage.
- Save cube slots: anything that works through the follower (Oculus, Nemesis, Avarice, Flavor of Time) doesn't need to be worn on the player or cubed in Kanai's Cube — that gives you valuable slots back.
- Keep all three followers geared and swap depending on the activity instead of re-slotting items every time.
- On skill choice: in solo play buffs are permanent — so go for value skills (Anatomy, Focused Mind, Prophetic Harmony) and strong debuffs like Night's Veil rather than randomly triggering crowd-control skills such as stuns.
Quick checklist
- Equip the immortality relic (Enchanting Favor / Skeleton Key / Smoking Thurible) — exception: the speed Enchantress with Hand of the Prophet.
- Choose the right buff skills (e.g. Anatomy and Night's Veil, Focused Mind or Prophetic Harmony).
- Place emanating and follower-compatible legendaries on the follower's slots (Oculus, Unity, Avarice, Nemesis, Flavor of Time, Cord).
- Choose the follower by goal: Scoundrel = push, Enchantress = speed farming, Templar = healing/resource.
- Fill all 14 slots with the correct main stat — no empty slot.
 Login with Battle.net