Greater Rifts (German: Große Nephalemportale, GR) are the beating heart of Diablo 3's endgame. They are timed, infinitely scaling dungeons that turn your progress into a single measurable number: your GR rank. Unlike regular Nephalem Rifts, they drop no loot along the way — the entire reward sits with the Rift Guardian at the end and in the Legendary Gems that can only be leveled here. This guide explains every mechanic from the ground up: opening rifts, the timer, Urshi and gem upgrades, Pylons, monster density, scaling, and the complete push strategy for solo and group play as of patch 2.7.x.
What Greater Rifts are
A GR is a self-contained, randomly generated dungeon with one job: kill enough monsters within 15 minutes to fill the progress bar, then slay the Rift Guardian. Succeed and your rank increases, unlocking the next level. GRs have no level cap — they keep getting harder as long as you keep adding damage and survivability.
- No drops along the way: monsters inside a GR drop no gold or items, only health globes and progress orbs. The real loot comes from the Guardian.
- No town trips mid-run: once inside, you can't change skills or gear without leaving the portal.
- Rank per class and mode: your solo record is tracked separately per class; group ranks are tracked on their own.
Prerequisites: before your first GR
You unlock Greater Rifts in Adventure Mode after completing Act I (Orek then appears by the campfire). You also need a Greater Rift Keystone.
- Run a normal Nephalem Rift (free to open in Adventure Mode).
- Fill the progress bar and kill the normal rift's Rift Guardian.
- The Guardian drops a Greater Rift Keystone almost guaranteed (level 1 the first time).
- Pick it up — it lands in your inventory.
Opening a GR — the Obelisk
With a keystone in your bag, you open the portal at the Nephalem Obelisk found in every town hub (Act I by the campfire, and in the other acts too).
- Walk up to the Obelisk and interact with it.
- Place the Greater Rift Keystone into the slot.
- Choose the GR level. Solo, you can pick any level up to your record +1; a successful clear automatically unlocks the next one.
- Confirm — a purple portal opens. Step through.
The 15-minute timer and the progress bar
Every GR starts with a fixed 15-minute timer (15:00) counting down. On the right edge of the screen you'll see the progress bar. Every monster you kill fills it a little; tougher monsters and elites give more.
- When the bar reaches 100%, the Rift Guardian spawns on your current floor.
- Kill the Guardian before the timer runs out and the GR counts as completed — rank up.
- If time expires first, the rift is failed: no rank, the keystone is gone.
Speed is everything. Clearing a GR in 4 minutes is worth more than clearing one in 14:59 — for gem attempts, for XP-per-hour, and for your next push attempt.
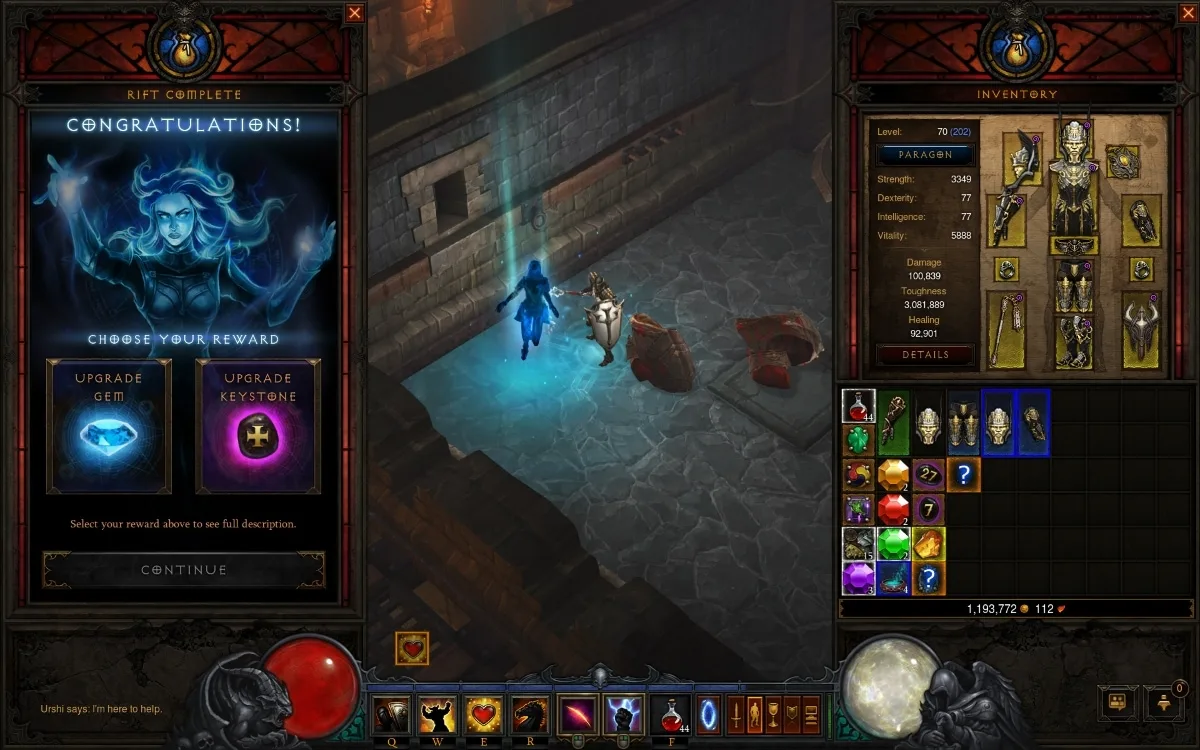
Urshi and leveling Legendary Gems
The moment the Guardian dies, Urshi appears — a nephalem spirit who channels the essence of gems. She offers to upgrade your Legendary Gems (e.g. Bane of the Trapped, Pain Enhancer, Gem of Efficacious Toxin, Zei's Stone of Vengeance).
How many attempts you get
- By default you get 3 upgrade attempts per completed GR.
- Finish the rift fast and you earn bonus attempts — up to 4 extra for very quick clears, so as many as 7 attempts total.
- You can pour all attempts into one gem or split them across several.
The success chance
Each attempt has a success chance based on two things: the gem's current rank and the GR level you completed.
- Up to gem rank 10, every attempt is guaranteed (100%).
- After that the chance drops as the rank climbs. Rough rule of thumb: if the GR level is at least equal to the gem's rank, the chance stays high; the further the gem's rank exceeds the GR level, the lower it gets.
- Beyond GR level ≈ your gem's rank, upgrading is barely worth it because the chance approaches zero.
[info] Several gems gain a bonus effect at rank 25 (e.g. Bane of the Trapped: a permanent damage aura; Pain Enhancer: bleed). Rank 25 is the first real milestone for many builds.
Scaling: level, health and reward
Each GR level raises monster health and damage exponentially (roughly +17 to +20% health per level). Ten levels higher and a monster has many times the health. In return, the rewards scale too:
- More XP per monster and from the Guardian — GRs are the best XP source in the game.
- Better loot from the Guardian: higher chance for Ancient and Primal Ancient items.
- Higher gem chance: the Guardian can drop additional Legendary Gems you don't own yet.
Monster density and layouts — the biggest speed factor
Your damage number alone doesn't decide clear time — monster density does: how many monsters stand clustered per screen so your area attacks fill the progress bar fast?
- Good tilesets (tight corridors, lots of monsters): Cursed Halls, Prison of Zoltun Kulle, dense cave layouts — the bar shoots up.
- Bad tilesets (sprawling, sparse): desert layouts, big open outdoor areas — you run more than you kill.
- Good monster types: large packs of weak enemies that die fast and fill the bar.
- Bad monster types: beefy single targets with lots of health and little progress value.
Pylons — the GR-exclusive buffs
Pylons (shrines with powerful timed buffs) appear only inside Greater Rifts. At high levels they often decide success or failure.
- Power Pylon: greatly increased damage for a few seconds.
- Channeling Pylon: no resource costs, no cooldowns, more damage — often the strongest pure-DPS pylon.
- Shield Pylon: invulnerability — ideal for aggressively pushing through dangerous packs.
- Speed Pylon: hugely increased movement speed, perfect for crossing empty stretches.
- Conduit Pylon: lightning arcs across the screen and kills almost everything — the most valuable pylon for progress, since its damage scales with on-screen monster count.
Finding and beating the Rift Guardian
When the bar hits 100%, the Guardian spawns on your current floor — an arrow hint points toward it. Key points:
- You do not have to reach the end of the portal. Fill the bar early and you can skip weak areas and rush straight to the Guardian.
- Many builds intentionally leave leftover monsters and charge the boss the instant 100% is hit.
- The Guardian varies a lot: names like Perdition, Erethon, Cälestrasza, Saxtris or Hamelin mean very different fights — some are pure DPS checks, others have dangerous mechanics (poison pools, summons, high movement speed).
Solo vs. group — the endgame meta
The highest clears come from 4-player groups with clear roles, because buffs, debuffs and pull effects multiply.
- zDPS / Support (often Barbarian, Crusader, Monk): deals almost no damage but pulls monsters together (the grouper/puller), buffs the team (e.g. war cry, damage debuffs) and keeps the boss alive.
- DPS (usually one dedicated damage dealer): exploits the stacked monsters and pylons for maximum output.
[info] For pure gem farming and XP-per-hour, solo or a casual group is plenty. The elaborate zDPS meta only pays off for serious leaderboard pushing.
Farming vs. pushing — two playstyles
- Farm GRs: pick a level you clear safely in 2–4 minutes. That gives the best XP-per-hour, the most gem attempts, and a steady stream of Ancient loot. Speed above all.
- Push GRs: go to your absolute limit. Accept resets on bad layouts, plan pylon use deliberately, and treat every portal as an attempt to beat your record by 1–2 levels.
An efficient farm session
- Set the game difficulty so normal rifts drop keystones quickly.
- Run a normal rift and collect (ideally several) keystones.
- Open GRs at your farm level, clear fast, upgrade your priority gem at Urshi.
- Repeat — and raise the level once clears drop consistently under 3 minutes.
Common mistakes
- Picked too high a level: timer fails or the boss DPS check stalls — keystone burned. Step up in small increments instead.
- Spread your attempts: leveling three gems at once instead of the one that matters — slow progress.
- Wasted pylons: firing a Conduit on an empty screen instead of in a dense pack or on the boss.
- Over-playing a bad layout: not resetting when pushing costs entire runs.
- Ignoring progress orbs: small but steady progress losses over a session.
Pro tips
- Reset discipline: when pushing, reset one time too many rather than too few. A strong opening (pylon + elite pack on floor 1) is worth its weight in gold.
- Save a boss pylon: if your build struggles on the Guardian, deliberately keep a Power or Conduit Pylon for the final floor.
- Gem priority: focus attempts on the gem with the biggest effect for your build (often Bane of the Trapped for damage) until it hits rank 25 or the next breakpoint.
- Level as a tool: lower the level when farming for speed/XP, and only raise it for pushing or for augmenting items (higher GR = a stronger item augment).
 Login with Battle.net